| Back to Back Issues Page |
 |
|
global-worming-news-August-2026 #Issue 110 August 06, 2026 |
Global Edition
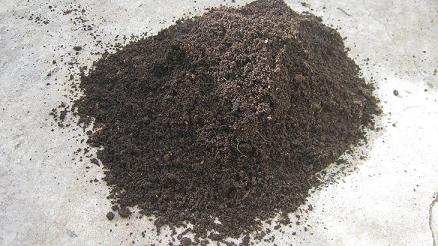
Worm Castings - When They Are Ready, How to Harvest, How to Store -============================================================= GLOBAL WORMING NEWS — JULY 2026 Worm Castings - When They Are Ready, How to Harvest, How to Store - Stephan Kloppert | worm-composting-help.com ============================================================= Hi, this is one of my favourite issues to write every year. Because wherever you are in the world, August is a worm castings month, just in two completely opposite ways. If you are in the Northern Hemisphere, your bin has been working hard all summer, and there is a very good chance you are sitting on a finished harvest right now, at the perfect moment to feed a garden in full swing. If you are in the Southern Hemisphere, you are at the other end of the wheel. Winter is loosening its grip, spring is only weeks away, and this is the month to get your castings ready and waiting for that first spring planting. So, this issue has something practical for both of you. First, the part that every worm farmer needs no matter where they live: how to tell when castings are genuinely ready, how to harvest them, and how to store them so they stay alive. Then I will talk to each hemisphere directly about what to actually do this month. And I want to clear up one thing that a lot of guides, including some very popular ones, get wrong. So let us start there. PART ONE — FOR EVERYONE, EVERYWHEREWhen are your castings truly ready? (The myth worth busting) Here is a thing you will read in many articles: that finished castings are dry and crumbly, and that if you squeeze a handful, it should fall apart.I want to gently set that straight, because it has confused a lot of good worm farmers into thinking their perfectly good castings are not ready. Properly finished castings, fresh from a healthy working bin, are usually quite moist and surprisingly heavy. Squeeze a handful and it will tend to clump and hold its shape rather than crumble away. That is completely normal. It is not a sign that anything is unfinished. They only become light, dark and crumbly, like fine coffee grounds, after they have been aerated and allowed to give up some of their moisture. So crumbliness tells you how dry your castings are, not whether they are ready. That is an important difference, and it is one I have watched trip people up for years. So how do you actually know they are ready? Judge it by three things, and texture is not one of them. -First, colour. Finished castings are a rich dark brown, almost black, and fairly even in colour throughout. -Second, content. You can no longer pick out the original food scraps or bedding. It has all been transformed into the same uniform material. If you can still spot last month's banana peel or shreds of newspaper, give it more time. -Third, smell. Finished castings smell clean and earthy, like a forest floor after rain. What you do not want is a sour, sharp, or foul smell, or a slimy, sludgy texture. That is not finished castings at all. That is a wet, airless pocket that has gone anaerobic, and it needs airing out and drier bedding before you go any further. Get colour, content and smell right and the moisture will simply be whatever it is. You can adjust that later to suit how you want to use or store them. How often can you expect a harvest?This surprises beginners, so it is worth saying plainly. Castings do not appear on a weekly schedule. In a single home bin, once or twice a year is normal. If you run a nesting bin or a continuous-flow system, you can take smaller harvests more often, because the finished material collects tidily at the bottom while the worms stay mostly near the top with the fresh food.Either way, the rule is the same: let the bin nearly fill and the material fully mature before you harvest. Patience genuinely does produce a better product here. How to harvest — three methods that workThere are several ways to separate castings from worms. Here are the three I reach for most, from simplest to most thorough.METHOD 1 — LIGHT AND CONE (single bins). About a month before harvest, stop feeding, and just keep the moisture right while the worms finish off what is left in the bed. On the day, tip everything onto a sheet in bright light and shape it into several cone-shaped piles. Wait ten minutes while the worms burrow down away from the light. Scrape the clean castings off the outside of each cone. Wait, scrape again, and repeat until only a ball of worms is left in each cone. Return them to fresh bedding. It is oddly satisfying, and it never lets me down. (It’s best to leave some castings for the worms to hide in to reduce their stress levels, before you move them into their freshly set up bin) METHOD 2 — MIGRATION (nesting bins). This is the one I recommend to beginners, because the worms do the work. Stop feeding the lower tray and feed only the tray above it. Over a few weeks the worms follow the food upward and leave the finished tray behind them, nearly empty of worms. Lift it out, harvest the castings, and put the empty tray back on top to start again. No sorting, no fuss. METHOD 3 — SIDE-FEEDING (any bin). Before you want to harvest, feed only one side of the bin for three to four weeks. The worms drift toward the food, leaving the other side ready to scoop out. Refill that side with fresh bedding and harvest the other side a month later once the worms have moved over to the new bedding and food source. How to store castings so they stay aliveThis part matters just as much to the Northern reader harvesting today as to the Southern reader storing for spring, and it is where a lot of good castings quietly lose their value. Worm castings are alive. They carry far more beneficial microorganisms than the material the worms first ate, and those living microbes are a big part of what makes castings so good for your plants.Store them badly and the microbes die, taking most of the benefit with them. Use a breathable container. A bucket with a few holes in the lid or a hessian sack work well. Never seal castings in an airtight bag, because the microbes need to breathe, and without air the wrong organisms take over and you get that sour, sludgy smell again. Keep them lightly moist, never bone dry and never soaking. If they dry out completely the microbes go dormant or die, and simply re-wetting them later will not bring that life fully back. A light misting now and then, or a sheet of damp newspaper laid on top, keeps them in good heart. Keep them somewhere cool and dark, like a garage, shed, or shaded corner. Stored this way, castings keep their life and their shelf value for many months, which is exactly what makes storing them over winter possible. Putting them to workThe simplest use is top dressing: a thin layer worked in around the base of a plant and watered in gently, feeding it slowly over time. Castings also give any seed-starting mix a lift, enrich a potting mix, give a transplant a strong start when a handful goes into the planting hole, feed a lawn without any burn risk when scattered thinly, and stretch a very long way as a gentle worm tea.There is real depth beneath each of those, the exact amounts different plants respond to best, proper worm-tea recipes, and how to prepare and clean castings up to a premium grade if you ever want to sell them. That is a whole subject of its own, and I am pulling it all together into something I will tell you about in a moment. NORTHERN HEMISPHERE — Your Harvest MonthFor you, this is the payoff. Your bin has been running at full summer speed, the castings have been building up, and your garden is in full production, which makes this the single best moment of the year to put fresh castings to work.Feed your hungriest performers first. Tomatoes, peppers, squash, courgettes and herbs all respond beautifully to a top dressing of fresh castings at this point in the season. A handful worked in around the base, watered in, and they will reward you within a couple of weeks. Harvest in the cool of the day. If you are separating worms outdoors under light, do it in the early morning or the evening, never in the midday heat. Strong summer sun harms exposed worms within minutes. A shaded spot with a bright lamp gives you the same effect without the risk. Mind the moisture as you go. Summer air dries a disturbed bin quickly, so re-wet the fresh bedding to a nicely moist, wrung out feel before you return your worms, and they will settle straight back in rather than trying to leave a bin that suddenly feels too dry. And do not strip the bin bare. Always leave some finished castings and plenty of worms behind, so the colony bounces back fast. A harvest is a haircut, not a shave. SOUTHERN HEMISPHERE — Your Preparation MonthFor you, August is not really a harvesting month, and that is exactly as it should be. Your bin has spent winter ticking over slowly, and a cold, sluggish bin should not be pushed into a big harvest it is not ready for. This month is about getting set, so that the moment spring arrives, you can move. If you took my advice back in the July issue and harvested before winter, you should have stored castings waiting for you right now. This is the month to check on them. Open the container, feel the moisture, and mist lightly if the edges have dried out. Castings that have sat quietly all winter are still full of value, as long as they were kept cool, dark and just moist. If you did not harvest before winter, please do not force one now. A cold bin has not finished its work, and digging through sluggish worms in the cold only stresses them. Wait until the middle of September, when the temperature lifts and the worms wake up and get moving again. There is nothing to gain by rushing it.Instead, spend August deciding where your castings will go first. Walk your garden. Notice the beds that struggled last season, the tired patches of soil, the pots that need refreshing. Those are your first targets when the black gold comes out, and a worm farmer who knows exactly where it is going wastes none of it. Meanwhile, let the winter bin tick along gently. Feed lightly, because a cold bin eats very little, and overfeeding a slow winter bin is one of the most common ways people accidentally invite smells and pests before spring has even started. Keep the bedding moist, since cold dry air quietly pulls the moisture out, and keep the bin sheltered or against a warm, sunny wall to bank every degree you can. Here in Cape Town, I am doing all of this right now, planning my September planting and getting my stored castings ready to spread. After a long, quiet winter bin, the first warm rush of spring is one of the real joys of worm farming, and a little preparation now makes it so much sweeter. PART TWO — FOR EVERYONE AGAINDid you know?Worm castings carry many times more beneficial microorganisms than the plain organic matter the worms started with. A handful of fresh castings is not just a scoop of nutrients, it is a living community you are introducing to your soil.That is exactly why fresh, well-stored castings from your own bin can outperform the dry, bagged product from a garden centre. The living microbes are the real magic, and whether you are harvesting today in the north or storing for spring in the south, keeping them alive is the whole game. Your quick win this weekTake a handful of castings from the bottom of your bin. Look at the colour, breathe in the smell, and see whether you can still recognize any old food or bedding in it. Dark and even, cleanly earthy, and nothing recognizable left? Then it is ready. Harvest it if you are in the north or store it well if you are in the south.Still see scraps, or catch a sour note? Close the bin, ease off the feeding, and check again in two weeks. With castings, patience always wins. An update on what I am building for you. Thank you to everyone who replied "PLANNER" after last month's issue. The response genuinely surprised and cheered me. The Worm Farming Planner and Journal is nearly finished. It gives you monthly planning pages, seasonal checklists that work for both hemispheres, feeding and observation logs, a harvest tracker, and room to record what actually works in your own bin, in your own climate. It is the tool I always wished I had in my early years, and it is built so a northern reader and a southern reader can each follow their own season through the same book. Subscribers to this newsletter will hear about it first, and will get the best price to be found anywhere. I am also quietly working on something larger, a complete troubleshooting resource that gathers every problem, cause and fix I have learned in twenty-five years into one place. More on that before long. Your questions and replies are shaping it as I write, so please keep them coming. My question for you this monthWhat do you use your worm castings for most? Garden beds, potted plants, the lawn, worm tea, seed starting, or something else entirely?Hit reply and tell me, and let me know which hemisphere you are writing from. I am genuinely curious how worm farmers around the world put their castings to work, and your answers will shape a future issue on the most creative and effective uses I hear back. Coming next monthSeptember flips the seasons once more. Many southern bins are waking up and racing into spring, while northern bins settle into their productive autumn rhythm.The September issue will be about worm population management for both hemispheres: how to tell when your bin is getting overcrowded, how to split a colony safely, and how to know when it is time to start a second bin. It is the question I am asked most as the seasons turn. Happy worm farming, wherever in the world you are, and happy harvesting. Stephan Kloppert 25+ year worm farmer | Author | worm-composting-help.com My book: How to Start a Profitable Worm Business on a Shoestring Budget — on Amazon You are receiving this because you subscribed to Global Worming News. Unsubscribe any time. |
| Back to Back Issues Page |