How to Harvest Worm Castings from Multi-Tier and Stacking Worm Bins
The Easiest Harvesting Method in Worm Composting — Your Worms Do Most of the Work
If you have been following along, you will know that in a previous article I walked you through harvesting worm castings from a single-layer worm bin using the light separation method. Several of you wrote in asking about multi-tier and stacking worm bins — and I promised to cover those separately. Well, here we are! And I have good news: harvesting from a multi-tier stacking bin is actually easier than harvesting from a single bin. In fact, the whole system is designed so that your worms do most of the separation work for you, completely on their own, using nothing more than their natural instinct to follow a food source upward. Before I dive in — I want to say what I always say: the methods I describe here are what I know and what has worked for me over 25+ years of worm farming. They are not the only ways to successfully harvest worm castings, and experienced worm farmers around the world each have their own approaches that work beautifully. Take what is useful to you, adapt it to your own setup, and don't be afraid to experiment. Worms are more resilient than beginners often expect — and more forgiving than most people give them credit for! 😄 That said — let's get into it.
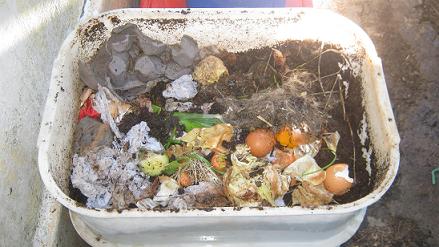
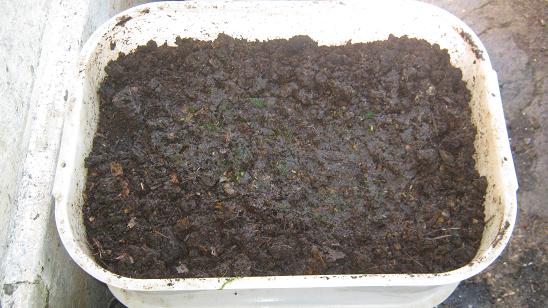 Worm castings in a stackable worm bin
What is a Multi-Tier or Stacking Worm Bin?
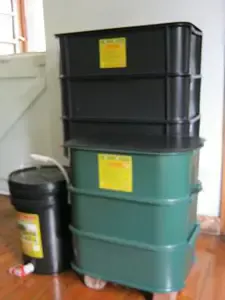
Before we talk about harvesting, it helps to understand how a multi-tier system works — because the harvesting method flows directly from the design. A multi-tier or stacking worm bin consists of several identical trays or bins stacked on top of each other. Each tray has a mesh or perforated bottom that allows worms — and liquid — to pass through from one level to the next. A solid collection tray or bucket at the very bottom catches the worm tea (liquid runoff), which is itself a valuable liquid fertilizer. The system is built on one beautiful fact about composting worms: they are top feeders. They always follow the food source — and food is always added at the top. So as each tray below them fills up and is processed into finished castings, the worms naturally migrate upward through the mesh into the next tray where fresh food and bedding are waiting. They leave behind beautiful, finished worm castings with very few worms remaining. This means that unlike a single-layer bin — where you have to physically separate the worms from the castings by hand — a multi-tier system separates them for you automatically, over time, with minimal intervention. Common commercially available stacking systems include the Worm Factory, Can-O-Worms, Worm Cafe, and many others. The method described here applies to virtually all of them. If you have built your own DIY multi-tier system — the same principles apply, as long as your trays have mesh or perforated bottoms that allow worm migration.
"Want to turn your worm bin into a real income? "How to Start a Profitable Worm Business on a Shoestring Budget" — the complete step-by-step guide from 25 years of real worm farming experience. Get it on Amazon:
 On Special
How a 3-Tier Stacking Worm Bin Works — and When to Harvest
Let me walk you through the lifecycle of a standard 3-tier worm bin, because understanding the progression makes the harvesting process completely logical. The starting setup: Most 3-tier systems start with the worms, their bedding and their initial food in the middle tray — the second tier. The top tray begins empty. The bottom tray is the liquid collection tray where worm tea drains to. Phase 1 — Filling the middle tray: You add food regularly to the middle tray — always placing it on top of the existing material. The worms feed, process, and deposit their castings. Over time — typically 2 to 4 months depending on temperature and worm population — the middle tray fills up from the bottom. Phase 2 — Activating the top tray: Once your middle tray is roughly full to the top, it is time to start using the top tray. Begin adding food and fresh bedding to the top tray only. To speed up migration, you can also physically move a handful of worms and some bedding from the middle tray into the top tray when you add food — this encourages the colony to recognise the top tray as the new feeding zone. From this point, the worms in the middle tray will smell the fresh food above them and begin their natural migration upward through the mesh bottom of the top tray. This migration takes time — usually 2 to 6 weeks for most of the worm population to relocate upward. Phase 3 — Harvesting the middle tray: Once your top tray is more than half full and most of your worms have migrated upward, your middle tray is ready to harvest. At this stage, you should see very little worm activity in the middle tray — mostly finished dark castings with few live worms visible. The bottom collection tray: Throughout this entire process, worm tea (liquid) has been draining into the bottom collection tray. Drain this off regularly — at least once a week — and dilute it 10:1 with water before using it as a liquid plant fertilizer. Do not let the liquid pool up and reach the mesh bottom of the tray above it, as this creates anaerobic (airless) conditions that worms dislike intensely. The same process repeats continuously: once you harvest the middle tray, it becomes your new top tray — cleaned out and filled with fresh bedding. The old top tray (now full of worms and food) becomes your new middle tray. The cycle continues indefinitely.
How to Harvest Your Multi-Tier Worm Bin — Step by Step
Step 1 — Stop feeding the tray you want to harvest About 2 weeks before you plan to harvest, stop adding food to the tray you are preparing to harvest. Continue feeding the tray above it as normal — this encourages the remaining worms to migrate upward toward the active food source. The hungrier they are, the faster they move! Step 2 — Add a bait layer 3 days before harvest day Three days before you plan to harvest, add a thin layer of fresh, attractive food to the tray directly above your harvest tray — not to the harvest tray itself. Ripe fruit, melon rinds, cooked vegetable scraps or a layer of moist coffee grounds work beautifully as migration bait. This creates a strong food signal that draws the last stragglers upward. Step 3 — Check the harvest tray on harvest day On your chosen harvest day, carefully remove the harvest tray from the stack and set it aside. Inspect the contents. You should see predominantly dark, crumbly, finished worm castings. Some partially processed material may still be present — this is normal and will continue composting once applied to soil. Step 4 — Remove any remaining worms and cocoons Even after a well-managed migration, some worms will remain in the harvest tray — particularly near the surface or in any remaining pockets of food. Gently pick these out by hand and return them to the active bin above. Look especially for the tiny lemon-shaped cocoons (eggs) which are yellowish-brown and about the size of a match head — these are gold, so try to return as many as you can to the active bin. If there are still quite a few worms present, you have two options: Option A: Place the harvest tray under a bright light for 15 to 20 minutes. The worms will burrow downward away from the light, concentrating near the bottom of the tray. Scoop off the top worm-free layer of castings, then repeat. Option B: Wait another week, keep the harvest tray positioned below the active tray with a small amount of fresh food in the active tray above it — the remaining worms may continue to migrate upward on their own. Step 5 — Empty your harvest tray Once you are satisfied with the separation, empty the finished castings into a bucket, bag, or directly onto your garden. Finished castings should be dark brown to almost black, light and crumbly, and smell pleasantly earthy — like a forest floor after rain. Step 6 — Clean and reactivate the harvested tray Rinse out the empty tray with plain water — no soap or chemicals. Allow it to drain and dry briefly. Then fill it with fresh moist bedding material (shredded cardboard, coconut coir, or aged compost) and place it back on top of the stack as your new top tray. Add a layer of food on top of the bedding and your system is reset and ready to go. Step 7 — Drain your worm tea collection tray While you have the system apart, check and drain the bottom liquid collection tray. Dilute the worm tea 10 parts water to 1 part tea before applying it to plants. This is liquid gold for your garden — do not throw it away!
Important Tips to Keep Your Worms Safe During Harvest
These tips come from hard experience — some of them learned the expensive way over 25 years of worm farming! 🌡️ Watch your temperatures. Worm castings that have been processed for several months can warm up quickly in direct sunlight. Never leave an open tray of castings — with or without worms — in direct hot sunlight. Even a few minutes of intense heat can kill worms rapidly. Work in shade or indoors on warm days. 💧 Keep everything moist. The contents of your harvest tray should remain damp throughout the process. If things are drying out quickly, lightly mist with a spray bottle. Dry conditions stress worms immediately and they will try to escape. 🐛 A small number of worms in your finished castings is completely normal and nothing to worry about. Unless you are selling your castings commercially (in which case presentation and purity matter), a handful of worms in your finished product will simply migrate into your garden soil once you apply the castings. They will do nothing but good there. 🥚 Cocoons in finished castings are a bonus, not a problem. If you are applying castings to a garden bed, any unhatched cocoons will hatch in the soil and your garden will have a happy little worm population of its own. If you are using castings in pots or containers, you may prefer to return cocoons to your worm bin first. 📦 Do not overfill your trays. Each tray should be filled to within 2 to 3 centimetres of the top — not all the way to the brim. Overfilled trays make the mesh connections too tight, restrict airflow, and make the whole stack unstable and difficult to manage. 🔄 Be patient with migration. If your worms are slow to migrate upward, the most common reason is that the tray above does not smell appealing enough. Make sure fresh food is added regularly to the active tray and that conditions are moist and inviting. You can also add a handful of worms manually to the upper tray to seed it with activity — the rest will follow. 🪣 Keep your worm tea tray clean. Standing liquid that is not regularly drained can become anaerobic — it will smell foul and create conditions that drive your worms out of the lower trays. Drain it at least weekly.
How to Know When Your Castings Are Truly Finished
Not all dark material in a worm bin is finished worm castings. Here is how to tell the difference between ready-to-harvest castings and material that needs more time: Ready to harvest — finished castings: • Dark brown to almost black throughout — uniform in colour • Light, crumbly and granular in texture — similar to fine coffee grounds or rich potting soil • Pleasantly earthy in smell — like a forest floor after rain, nothing offensive • No visible food particles — everything has been fully processed • Low worm activity in this tray — most worms have moved on to fresher pastures Not ready yet — needs more time: • Visible food scraps still recognisable — apple cores, eggshells, leafy matter • Sour, ammonia-like, or foul smell — indicates anaerobic conditions or under processed material • High worm activity still concentrated in this tray — the worms know there is still food worth eating • Stringy or fibrous texture — unprocessed bedding still present If in doubt, wait another 2 to 4 weeks before harvesting. There is no rush — finished castings stay perfectly good inside the bin for weeks or months without any degradation. Patience pays dividends in quality.
Other Ways to Harvest From Stacking Bins
As I said at the start — the migration method described in this article is one approach, not the only approach. Experienced worm farmers use a variety of other methods with great results, including: Sieving or screening: The contents of the harvest tray are passed through a mesh screen with holes of approximately 6mm to 10mm. Worms and unprocessed material are too large to pass through and are retained on top, while fine finished castings fall through into a container below. This method is faster than the migration method but more hands-on. The light method combined with tray harvesting: If worms are still abundant in your harvest tray, place it under a bright light source and form the contents into small cones as described in the single-bin harvesting article. The worms burrow downward, you scrape the outer layers, and repeat. This is particularly effective when migration has been incomplete. Full bin dumping: Some worm farmers simply tip the entire contents of the harvest tray onto a tarp and use the light method or hand sorting to separate the whole batch at once. This is more thorough but more time-consuming. Each method has its place. The migration method is the most hands-off and beginner-friendly. The sieving method is the fastest for large volumes. The light method is the gentlest. Choose what works best for your setup, your time, and your comfort level with handling worms. Coming up in a future article: how to use your finished worm castings and worm tea for maximum garden benefit. 🌱
Want to Turn Your Worm Farm Into a Profitable Business?
If this article has you thinking about whether worm farming could be more than a hobby — you are not alone. Thousands of people around the world have turned their backyard worm bins into a genuine income stream, selling worm castings, worm tea, live worms, bait worms and worm farming systems to a growing market of gardeners, farmers and eco-conscious households. I wrote a complete guide to doing exactly that:
"How to Start a Profitable Worm Business on a Shoestring Budget"
— covering everything from setting up a commercial operation on a minimal budget to finding customers, pricing your products and scaling up over time. It is available on Amazon in both Kindle and paperback. Check out the Links below:
I hope this article takes the mystery out of multi-tier harvesting and gives you the confidence to get the most out of your stacking bin system. Once you have done it once, you will wonder why you ever found it daunting — the whole process becomes second nature very quickly. As always, if you have questions, observations, or experiences of your own to share, please leave a comment below or get in touch. Every worm farmer's setup is a little different and there is always something new to learn — even after 25 years! 🪱 Happy composting! — Stephan Kloppert worm-composting-help.com
"Want to turn your worm bin into a real income? "How to Start a Profitable Worm Business on a Shoestring Budget" — the complete step-by-step guide from 25 years of real worm farming experience. Get it on Amazon:
On SpecialRecent Articles


-
How to Harvest Worm Castings from Stacking Bins (Step-by-Step)
Jun 10, 26 08:16 AM
 Learn how to harvest worm castings from multi-tier stacking bins the easy way. Step-by-step guide from a 25-year vermicomposting expert.
 -
How to Start a Profitable Worm Business on a Budget
Jun 09, 26 09:04 AM
 Learn how to start a profitable worm farming business with minimal investment. Proven vermicomposting methods from 25+ years of experience. Sell worm castings, worm tea, and bait worms for real income…
 -
Worm composting Advice?
May 08, 26 03:36 AM
Hi, Just checking if you're still around? I've been growing a thriving worm farm and need some advice. Thanks, Rezah
"Want to turn your worm bin into a real income? "How to Start a Profitable Worm Business on a Shoestring Budget" — the complete step-by-step guide from 25 years of real worm farming experience. Get it on Amazon:
Search / Suchen
Our New Book

Order the Kindle E-book for the SPECIAL PRICE of only
$4.95
Prices valid till 30.06.2026!