How to Harvest Worm Castings from a Single Worm Bin Using the Light Separation Method
A Beginner-Friendly, Step-by-Step Guide from 25+ Years of Worm Farming Experience
After more than 25 years of worm farming I still love the moment when you open a mature worm bin and see beautiful dark, crumbly worm castings ready to harvest. If you are new to worm composting, harvesting can feel a little daunting at first — but it does not have to be.
In this article I will walk you through one of the simplest and most beginner-friendly harvesting methods available:
the light separation method.
It requires no special equipment, is completely safe for your worms, and can be done by anyone — even on your very first harvest.
Important note before we begin: there is no single "correct" way to harvest worm castings. Experienced worm farmers each have their own preferred method's and every approach has its merits. What I share here is what I know works — but always feel free to adapt any method to suit your own situation and setup.
Also please note: this article covers single-layer worm bins only. Multi-tier and stacking worm bins have their own harvesting methods that are in many ways even simpler — I will cover those in a separate dedicated article.
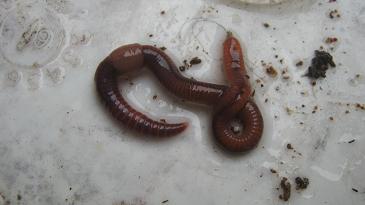
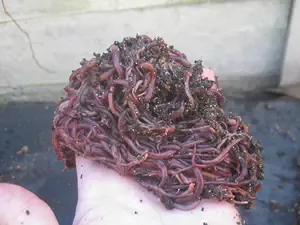
 Freshly harvested worm castings
Important Points to Keep in Mind Before You Begin
Before you touch your worm bin, please read these points carefully. They could save your worms' lives — especially in warm climates.
🌡️ Never work in direct hot midday sun. Earthworms can die within minutes when exposed to heat and direct sunlight on a hot day. If you live in a warm climate, always harvest in the early morning, late afternoon, or in a cool shaded area. This is non-negotiable.
💧 Keep a spray bottle of water nearby. If your working pile starts drying out during the process, lightly mist it to keep conditions moist. Dry conditions stress your worms quickly.
⏰ Do not rush. The light separation method works gently and naturally — but it cannot be hurried. If you scrape too quickly you will end up with live worms in your castings bucket. Take your time and let the worms move on their own schedule.
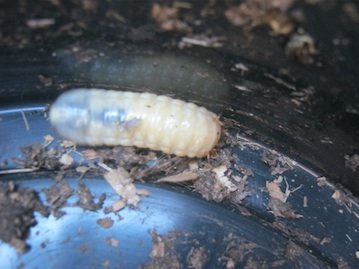
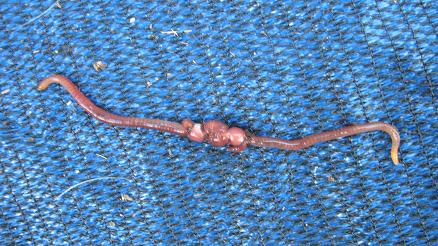
🥚 Watch for cocoons. Worm cocoons are tiny, lemon-shaped eggs — yellowish-brown in colour, roughly the size of a match head. They are extremely valuable. Try to return as many as you can to your worm bin. Each one can hatch 2 to 7 baby worms within a few weeks.
🪱 A few small worms in your finished castings will be perfectly normal. It is nearly impossible to remove them all. Do not stress about getting every single worm out. A small number of worms remaining in harvested castings will not harm your garden — they will simply migrate into some nutrient rich soil once you apply the castings or might be picked up by a hungry bird which unfortunately happens from time to time too.
How to Know When Your Worm Bin Is Ready to Harvest
Before you begin harvesting, make sure your bin is actually ready. Harvesting too early is one of the most common beginner mistakes — and it results in partially processed material that is not yet fully broken down. Your worm bin is ready to harvest when:
• The contents looks like rich, dark, earthy compost — similar to a forest floor after rain
• You can no longer identify the original food scraps you added — everything should be uniformly dark and crumbly
• The bin feels noticeably heavier and more compact than when you started
• The worm population appears healthy, active and well-fed
• The material has a pleasant earthy smell — not a sour, rotting or ammonia-like odour
If any food scraps are still recognisable or the material smells off, give the bin another 2 to 4 weeks before harvesting. How long does it take? A single-layer worm bin typically takes at least 4 to 6 months to produce its first harvestable castings, depending on temperature, worm population size, and how regularly and how much you have been feeding. In warmer climates the process is faster — in cold climates it slows down considerably.
What You Will Need
The beauty of the light separation method is that it requires almost nothing you do not already have at home:
• A tarpaulin, large sheet of plastic, or a table covered with several layers of newspaper
• A bright light source — natural daylight is ideal, or a strong lamp if working indoors
• A bucket or large container for your finished worm castings
• A second container with some bedding inside to hold your separated worms
• A spray bottle filled with water
• A pair of rubber gloves if you prefer not to handle worms directly
• Patience — this is the most important item on the list That is genuinely all you need. No sieve, no special tools, no equipment to buy.
Step 1 — Prepare Your Bin Two Weeks Before Harvesting
This preparation step is often skipped by beginners — but it makes a significant difference to the quality of your harvest. About two weeks before you plan to harvest, stop adding new food to one side of your bin — or stop feeding altogether if you plan to harvest the entire bin. This serves two purposes:
First, it encourages your worms to finish processing whatever food remains in the bin, giving you cleaner, more uniform castings.
Second, as food becomes scarcer in the current bin, your worms will be more motivated to migrate toward any fresh food you place in an adjacent area — which makes the separation process even more efficient.
You can continue to lightly mist the surface of the bin to keep moisture levels up during this two-week period. Do not let the bin dry out completely.
The Light Separation Method — Step by Step
Step 2 — Set up your working surface
Lay your tarpaulin or plastic sheet on a table in a well-lit area. Natural outdoor daylight works best on a mild day. If you are working indoors, position a strong lamp directly above your working area so that bright light shines down onto the surface from above.
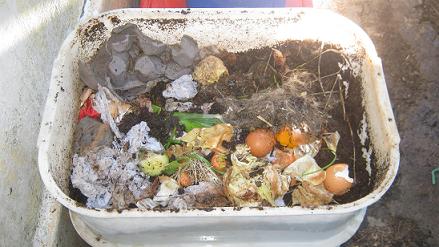
Step 3 — Empty the contents of the bin onto the surface
Carefully tip the entire contents of your worm bin out onto the sheet. You will see a large mixed pile of dark castings, worms, cocoons and possibly a few remnants of unprocessed food scraps. Do not be alarmed by how mixed everything looks — this is completely normal.
Step 4 — Divide the pile into small cones
Using your hands, gently divide the material into 1, 2 or 3 pyramid or cone shapes.
Step 5 — Wait and let the worms do the work
Leave the cones under the light for 10 to 15 minutes. The worms will instinctively burrow away from the light, moving downward into the dark centre and base of each cone. This is their natural survival response — and it does all the separation work for you. After 10 to 15 minutes, the outer surface of each cone will be noticeably drier and free of worms.
Step 6 — Gently scrape the outer layer into your castings bucket
Using your hand or a soft tool, carefully scrape the worm-free outer layer of each cone into your casting's container. Work slowly and gently. You are looking for clean, dark, crumbly castings with no visible worms. If you see worms when you scrape, stop, move to the next cone scrape its worm-free layer. If needed wait a few more minutes and try again.
Step 7 — Reshape and repeat
After scraping, the remaining core of each cone will be smaller and still full of worms. Reshape it into a new, smaller cone and wait another 10 to 15 minutes before scraping again. Repeat this process several times per cone. Each round of scraping will yield cleaner castings with fewer worms remaining.
Step 8 — Collect your worms
After 3 to 4 rounds of scraping, what remains will be a small, concentrated collection of worms, cocoons, and a small amount of partially processed materials.
Step 9 — Return your worms to a freshly prepared bin
These worms are your precious worm colony. Collect them carefully and set them in a freshly prepared worm bin with clean, moist bedding materials — shredded cardboard, coconut coir, or aged compost all work well. Add a small amount of fresh food to one corner or one half of the bin and gently place your worms on top of the bedding. They will burrow in naturally within a few minutes.
Step 10 — Separate any cocoons you find
If you noticed worm cocoons during the process, place them in a small bin with a little moist bedding close the lid and keep them in a warm place. They will hatch within a few week's and the baby worms can either be added to your main bin or a new worm bin.
How to Finish, Store and Use Your Worm Castings
Once you have completed the separation process, allow your harvested castings to dry slightly in a cool, shaded area before storing or using them. Spread them out loosely on a tray or flat surface and leave them for a few hours — this allows any remaining cocoons to become visible and lets excess moisture evaporate.
Fully finished worm castings should be:
• Dark brown to almost black in colour
• Light, crumbly and granular in texture
• Pleasantly earthy in smell — like a forest floor after rain
• Uniform in appearance with no recognisable food particles remaining
Storing your castings
Store in a breathable container — not a sealed airtight bag or bucket. A cloth bag, a cardboard box, or a container with small air holes is ideal. Worm castings stay biologically active (full of beneficial microorganisms) for many months when stored correctly in a cool, shaded place.
How to use your worm castings:
• As a soil amendment: mix into garden beds or potting soil at a ratio of 10 to 30% castings to soil
• As a top dressing: sprinkle around the base of plants and water in gently
• For seedlings: mix a small amount into seed raising mix — castings cannot burn roots so they are completely safe for young plants
• To make worm tea: steep a handful of castings in a bucket of dechlorinated water for 24 hours, aerate with a fish tank pump, then apply as a liquid fertilizer
Unlike chemical fertilizers, worm castings cannot burn plant roots regardless of how much you use. They are completely safe and beneficial for all plants.
Other Ways to Harvest Worm Castings From a Single Bin
As I mentioned at the start — there is no single correct method for harvesting worm castings. The light separation method described in this article is one of several approaches used successfully by worm farmers around the world. Each method has its advantages depending on your setup, time available, and personal preference. Other commonly used harvesting methods for single-layer worm bins include:
The migration method: Rather than emptying the bin, you push all the existing material to one side of the bin and add fresh bedding and food to the empty side. Over the following 2 to 4 weeks, your worms will naturally migrate toward the fresh food, leaving the finished castings on the other side largely worm-free and ready to harvest.
The screening or sieving method: The contents of the bin are passed through a mesh screen or hardware cloth with holes of approximately 6 to 10mm. Worms and unprocessed material are too large to pass through and are retained on top of the screen, while finished castings fall through into a container below.
The divide and conquer method: The bin contents are simply divided in half, with one half placed into a new bin with fresh bedding and the other half left to finish processing. Both halves contain worms and both will continue to produce castings.
For those of you using multi-tier or stacking worm bins — the harvesting process works on an entirely different principle and is in many ways simpler and less hands-on. I will cover multi-tier bin harvesting in detail in a dedicated article coming soon.
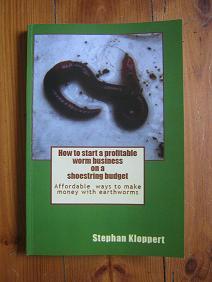
Want to Learn How to Turn Your Worm Castings Into a Profitable Business?
If you are interested in going beyond home composting and learning how to turn your worm farming into a genuine income — selling worm castings, worm tea, live worms, bait worms and worm farm systems — I have written a complete guide to help you do exactly that. "How to Start a Profitable Worm Business on a Shoestring Budget" covers everything from setting up a commercial worm farm on a minimal budget, to finding customers, pricing your products, and scaling your operation over time. It is available on Amazon in both Kindle and paperback formats.
👉 Get the Kindle eBook on Amazon — Read Instantly on Any Device
👉 Order the Paperback Edition on Amazon
I hope this guide takes the mystery out of harvesting worm castings and gives you the confidence to get your hands into that bin! Harvesting day is genuinely one of the most rewarding moments in worm farming — seeing those beautiful dark castings that your worms worked so hard to produce is deeply satisfying.
If you have any questions about the light separation method, about harvesting in general, or about any aspect of worm composting — please feel free to leave a comment below or get in touch.
There is no question too basic or too advanced. Worm composting has been a passion of mine for more than 25 years and I am always happy to share what I know. Happy harvesting! 🪱 —
Stephan Kloppert worm-composting-help.com
Learn how to make money with worm composting
$ Money
The Worm Bin Checklist:
"7 Mistakes Killing 90% of Beginner Worm Farms"
[Sign up below to Get Your Free Checklist ]
Recent Articles
-
How to Start a Profitable Worm Business on a Budget
May 19, 26 01:30 PM
 Learn how to start a profitable worm farming business with minimal investment. Proven vermicomposting methods from 25+ years of experience. Sell worm castings, worm tea, and bait worms for real income…
 -
Worm composting Advice?
May 08, 26 03:36 AM
Hi, Just checking if you're still around? I've been growing a thriving worm farm and need some advice. Thanks, Rezah -
how to start worm composting at home
Apr 29, 26 09:21 AM
 Learn how to start worm composting at home with this complete beginner’s guide. Step-by-step setup for a worm bin, best bedding, feeding tips, troubleshooting, and harvesting worm castings for superio…
Search / Suchen
On SPECIAL
"How to start a profitable worm business on a shoestring budget
Order a printed copy from "Amazon" for only
or a digital version from the "Kindle" store for only
$4.99
Prices valid till 31.05.2026
Our New Book
Order the Kindle E-book for the SPECIAL PRICE of only
$5.95
Prices valid till 31.05.2026!